IN PART 7 OF WORD FOR WRITERS, I covered how to manage page breaks. Today, we’ll talk about section breaks.
Many people work with Word for years without ever understanding or using Word’s sections. This may be due to the fact that many Word documents are only a single section. In fact, a multiple page document can be just one section. However, section breaks give you much greater control over a document.
What are section breaks?
To understand how to use sections breaks, it’s important to first answer the following two questions:
- What is the difference between a page break and a section break?
- When would you want to use a section break?
To answer the first question, a section break can occur within a page, without moving the following text to a new page; in contrast a page break always moves the following text to a new page. Another way to put it is that page breaks move text to a new page before reaching the end of a page, while section breaks create a barrier between parts of the document for formatting purposes. But the thing that really sets sections part from page breaks is that each section in a Word document can have its own distinctive page formatting. With section breaks, you can create different headers and footers, different page, footnote, and endnote numbering, change the layout, page borders — all within the same document!
It’s a little like citrus fruit: each whole fruit consists of sections, and each section has its own unique structure and pattern.
To answer the second question about when you’d want to use a section break, any time you need or want to change some aspect of the formatting, such as number of columns, margin width, page numbering, and so on, then you’ll want to insert a section break. For example, perhaps you want to number the front matter of your book using small roman numerals, and you want the main chapters of your book to start on page 1. To do this, you’ll need to employ section breaks.
You’ll want to insert a section break for any of the the following situations:
- Columns: You might want a particular section of your document in two or three-column format instead of the standard one-column format. Section breaks make this possible. You can even change the number of columns occurring on a single page by dividing the page into two or more sections.
- Different paper sizes or page orientation: Parts of your document are landscape and parts are portrait.
- Different margins: You might want to write a multi-page letter, where a two-inch top margin on the first page, but the following pages all have one-inch top margins plus a header that doesn’t start until the second page.
- Different headers and footers: For any kind of document that requires different formatting for various headers and footers.
- Different numbering schemes: You might want your Table of Contents to be numbered with lower case Roman numerals (i, ii, iii) while the main body uses regular numerals (1, 2, 3) and the document ends with Appendices using alphabetic numerals (A, B, C).
- To restart numbering for different chapters: Word uses automatic numbering for figures and other items. If you have a multi-chapter document, and want the numbers to restart with each chapter, each chapter will need to be contained in its own section.
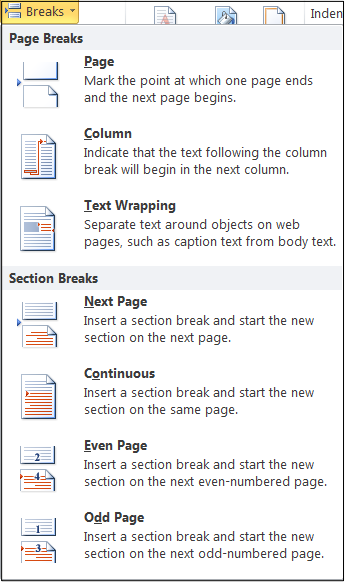
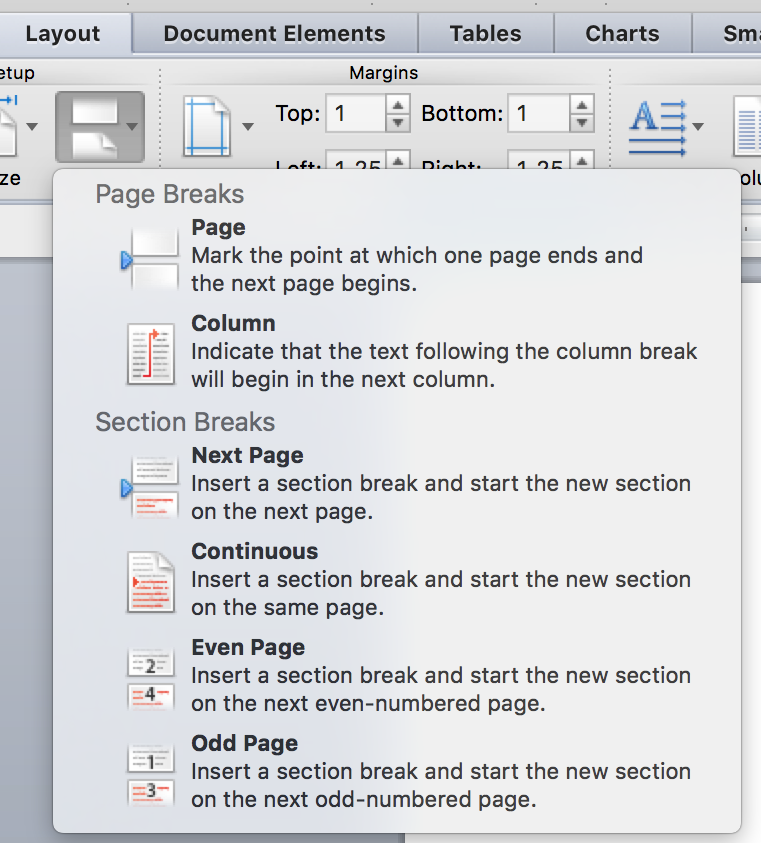
There are four different types of sections breaks:
- Next page. This type of section break works well when you want to start a new chapter in your book. Unlike the standard Page Break, this option moves you to the next page and gives you the option to format the new section differently from the previous section.
- Continuous. This type of section break allows you to change number of columns or change other basic formatting, all on the same page.
- Odd Page. This type of section break pushes the following text to a new page, but it will always print on an odd page. For example, if you want the different parts of your book to always start on right-hand pages, then this section break forces the new part to an odd page, no matter what revisions you make to the preceding text in the meantime.
- Even page. This works the same as Odd Page sections breaks, except it forces the following text to the next even numbered (or left-hand) page.
How to Insert a Section Break
- Select the Page Layout tab (on the Mac, it’s the Layout tab).
Word 2010 
Word – Mac 2011 
- Select the Breaks drop-down menu on the Page Setup section.
Word 2010 Word for Mac 2011 - Select the type of break you want from the Section Breaks drop-down.
How to view section breaks
- Show invisibles by selecting the show/hide invisibles (the paragraph mark) from the Paragraph section on the Home tab.
Invisibles Icon – Word 2010 Invisibles Icon – Word for Mac 2011
How to delete a section break
- Highlight the section break. (I find it’s easiest to click at the beginning of the section break, then hold down the Shift key and press the right arrow button. That will highlight the entire break.)
–
a column section break, selected

- Press the Delete key.
Try it Out …
- Open a Word document and save it with the name “Section Exercise.”
- Insert some text. (Make it easy on yourself — copy and paste text from another document).
- Make sure that Show Invisibles is selected.
- Insert your cursor between two paragraphs and then insert a Continuous section break. Change the column settings for the new section.
- Delete the section break you created. What happens to the columns?
- Insert an odd page section break and print your document. What do you notice?
- Do the same with an odd page section break.
In the next installment of Word for Writers, I’ll show you how to manage Headers, Footers, and Page numbering … and how these work together with section breaks.
Until then, happy December, happy year end, and happy preparation for the holidays!
_________________________________________________


UNBELIEVABLY PERFECT TIMING!!! i’m gonna have to do this to my MS to get the page numbers and headers right—i.e. not in the front matter—so i can re-upload! thanks for all your great and helpful posts. i’ve used Word for years but there are several functions (like this) i’ve never needed before now!
Merry Christmas!!
Robin, I’m so glad this post was helpful to you. I think you’ll love the posts on controlling headers and footers coming up soon.
Thank you for the instruction. No matter how long I have a program, there is always something new to learn. : )
Patsy, that’s what makes life great … we’re always learning and growing!
Amber, kudos on another info-packed post. The people who will benefit the very most from this info are the aspiring self-publishers among us. IMO, styles and section breaks are the keys to the self-publishing kingdom. So many people are sure their brains will explode if they venture into these areas, and you make them so accessible.
BTW, if anyone is confused about how to “Show invisibles,” in Windows that’s Show/Hide ¶. Click the ¶ symbol in the Quick Access Bar at the top of the window to toggle display of paragraph and page breaks and similar marks off and on.
Thanks, Sharon for the clarification for Windows users. 🙂
Pingback: Word for Writers, Part 9 – Headers, Footers, and Page Numbering — Writing Through Life