ONE MICROSOFT WORD SKILL you will never regret taking the time to learn is how to create and use templates. Templates are files that contain ready-to-use formatting and styles. You simply add the content. You may already be aware that Word comes with loads of stock templates for manuscripts, research papers, cover letters, resumes, brochures, certificates, invitations, newsletters, flyers, and more. In fact, any time you open a new, blank document in Word you are using a default template.
When you open a template, it opens automatically as an untitled Word document (i.e. “Document1”). You can then enter your content and save it as a normal Word document.
For example, you might want to write a business letter. Instead of creating the structure and format of a letter from scratch, you decide to use one of Word’s stationery templates with a predefined page layout, fonts, paragraph formatting, margins, and so on. Opening the template creates a new document, and when you save it, the document is saved separately from the original template, which can be used again and again.
With all these ready made templates, why would you want to create your own? Well, you might have a specific font or format you like to use when you write, or you might want to save a template with your name and contact information already included in it so you don’t have to enter that information each time you use the template.
To create your own, customized template, you can start with a blank document, specify the structure and then save it as a template. But I think the easiest way to create your own template is to start with one of Word’s generic templates, personalize it to suit your needs, then save it as a new template. For practice, let’s start with modifying a manuscript template.
How to Customize and Save a Manuscript Template
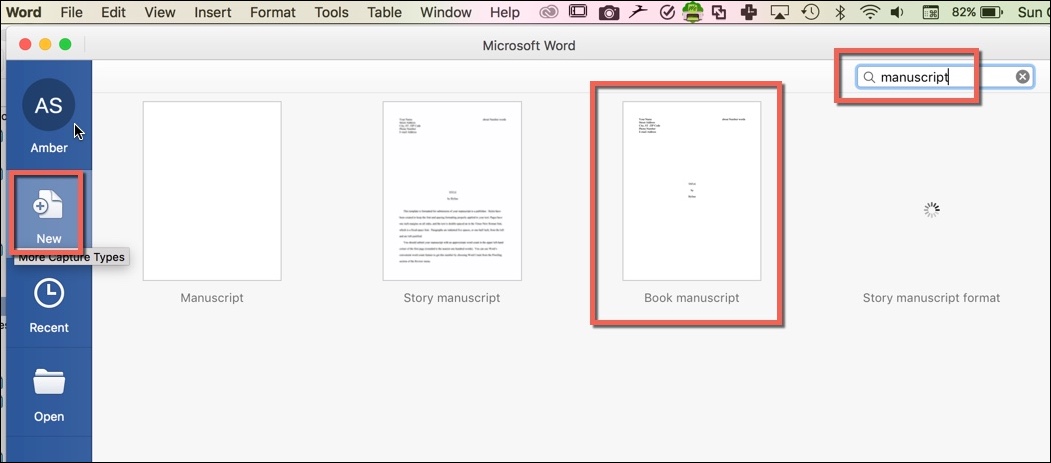
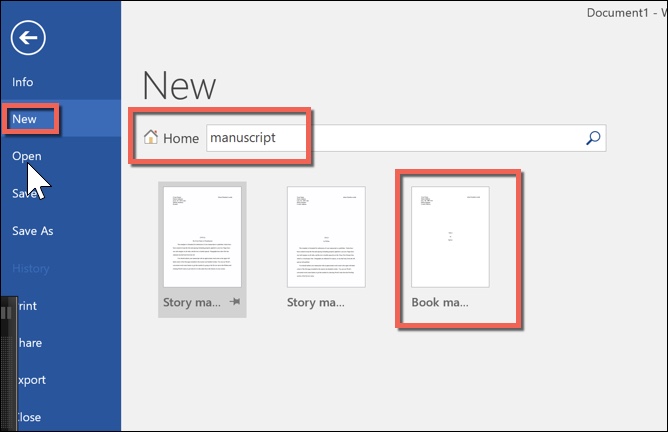
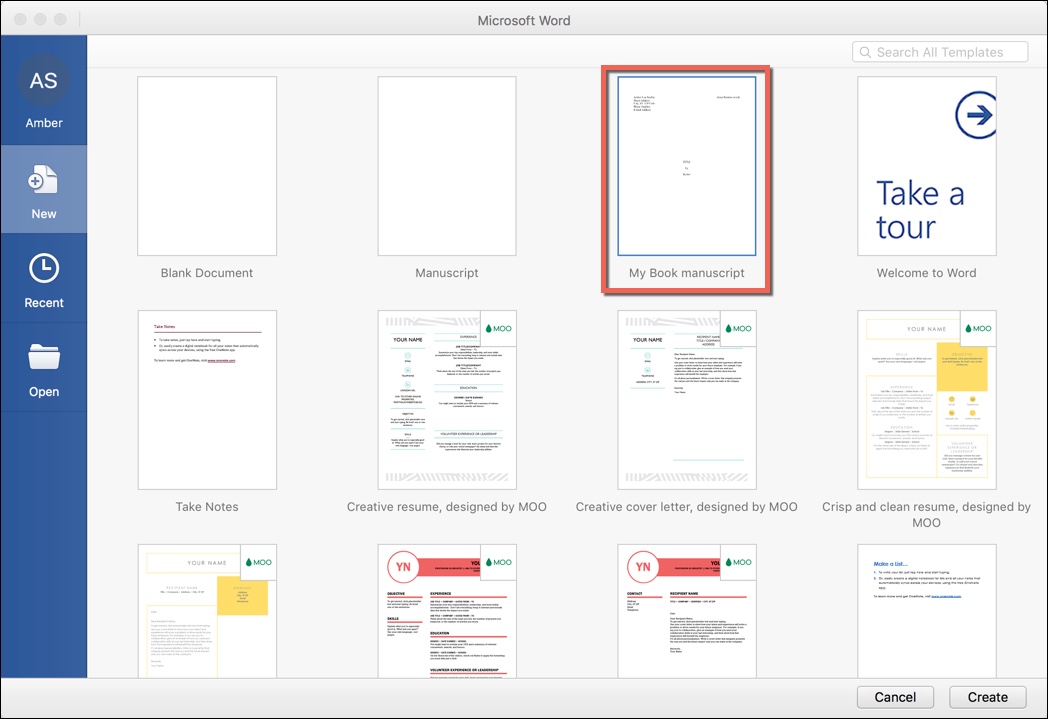
- When you open Word for the first time, the OPEN NEW FROM TEMPLATE window automatically opens. To open this window when you are already in a Word document, select File > New From Template.
– - Enter the word “manuscript” in the Search field in the upper right corner.
– - Select the Book Manuscript template and click the Create button.
The New From Template Window on a Mac
The New from Template Window on a PC
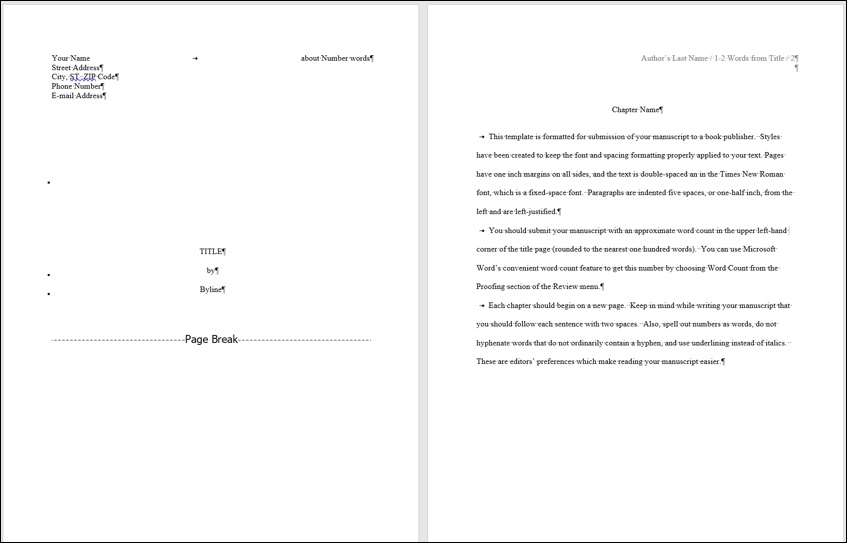
- The template will automatically open as a 2-page document titled “Document1.”
– - Before proceeding, I suggested displaying your invisible, nonprinting characters by clicking the paragraph icon in the Standard tool bar under the Home tab:

– - You’ll notice that:
- The front page contains generic placeholders for your name, address, title, number of words, etc.
- The body of the document contains a header with generic placeholders for your name, abbreviated title, and page number.
- The body of the document is formatted in double-spaced, 12 pt. Times New Roman font with tabs forcing first line paragraph indents.
- Save your template under a new name:
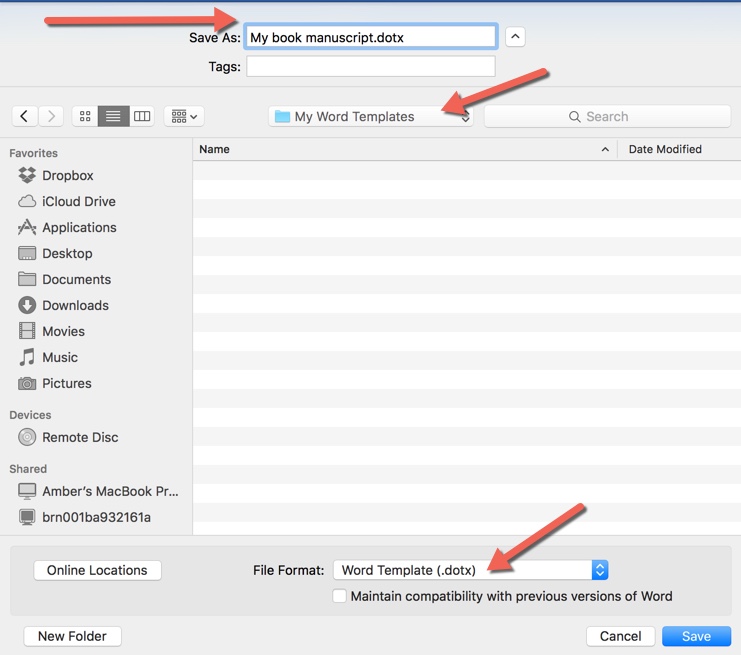
- Select File > Save As.
–
Note: Unless you select a different location user templates are saved in a default location on your hard drive. To change where Word automatically saves your templates,- On a Mac, under the Word menu, click Preferences, and then under Personal Settings, click File Locations. Under File Locations, select User templates from the list, and then click Modify. Navigate to and select the new folder you want to use, and Word will save any new templates in that folder.
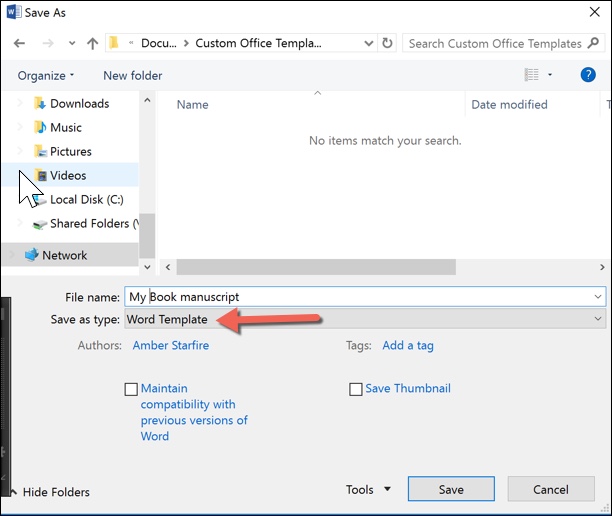
- On a PC, Select the File tab then select Options. Select Advanced in the WORD OPTIONS dialogue box. Then scroll down to the General section, click on File Locations, select User Templates, and Modify. Then navigate to and select the folder where you want to store your templates. Click OK.
–
- Select Word Template (.dotx) from the File Format drop-down menu. If you neglect this step, your file will be saved a document instead of a template.
– - Give your template a name.
– - Click Save
- Select File > Save As.
Save As Dialogue Box on the Mac
Save As Dialogue Box on the PC
- On the cover page, replace the generic author name and address information with your actual name and address. Remember, this is a template you will reuse for different manuscripts, so do NOT enter a title or number of words.
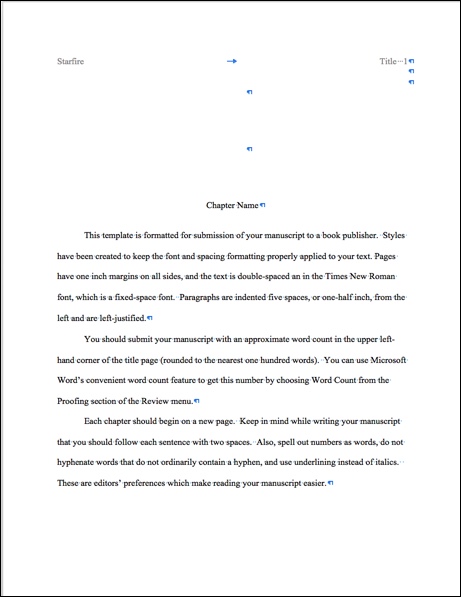
– - Double-click in the header area of page 2 to open the header and change the information and/or format. Make any desired changes to the header that you would like to keep in your template. In the following example, I have:
- Inserted and left aligned my last name as author name.
- Right-aligned the Title placeholder by using a right-aligned tab.
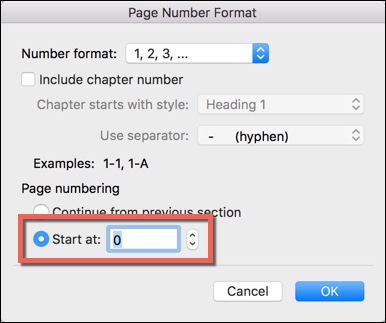
- Forced the page numbering to start on page 1 (you don’t want to count the cover page as page 1).
- To force the 2nd page to display as page 1:
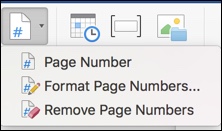
- Select Format Page Numbers from the Page Number button under the Header & Footer tab and start the manuscript at zero.
For more about page numbering, see my post on Headers, Footers, and Page Numbering.
- Click Close to close the header when you done making changes.
- Change the body style of the text to your desired format. In my example, I:
- Kept the 12-point, double-spaced Times New Roman font.
- Moved the chapter title about 1/3 of the way down the page.
- Removed the first line tabs and changed the Body style so that the paragraph is formatted properly with a first line indent. For more information about changing paragraph formatting and styles, see my Word for Writers post on Creating and Using Styles. (Using tabs to indent the first lines of paragraphs is generally frowned upon by editors and book formatters because it makes the manuscript more difficult to reformat.)
- Save and close your completed template (double-check to make sure you are saving it in the .dotx (not .docx) format.
Using your template to create a new document
There are several ways to create a new document from your template. If you have saved your template in a custom folder, the easiest way is to locate your template in your Mac Finder or PC File Explorer window and double click on it. The template will automatically generate a new document titled “document1” (or 2 etc., depending upon how many new documents you have opened).
If you have saved your template in Word’s default template location or specified a custom location:
- Select File > New from template.
- Select the template you created, and then click Create.
- A new document will open based on the template you created.
– - Give it a new name and save.
That’s all there is to creating your own custom templates. You can start with an existing template, as we did here, or you can start from scratch, specify your own styles and document settings, and save as a new template.
How will you use Word’s custom templates?





YASSSSS!!!!! Saved me a TON of time—which I already did not have due to missing deadline—getting my last book formatted to upload!!! I call them master docs, but same principle. It’s a template of how I want my books and blog posts to appear! SUPER post, Amber. I’ll keep this one on file for future reference!!
Thanks for the compliment, Robin. Yes — Master Documents — same concept.
I love this post. As soon as I thank you again––right now: thank you––I’m going to create my own customized manuscript template. : )
Learning to use the tools of this program are helping me become a better writer.
I’m happy these posts have been useful for you, Patsy. 🙂
Your mentoring is so helpful to me….I thank you for sharing your expertise. It is invaluable!
Thank you Marggie. That’s wonderful to hear (read)!
Thanks, Amber. Why haven’t I discovered this before? I feel like such a knucklehead. I am so doing this!!